This is very simple but useful trick for many of the people s who are tired from seeing their Default Login Screen Of Windows XP. Changing this is easier than most people would ever believe.This post will describes you step-by-step procedure how to change the your Windows XP default logon screen off. By default Windows XP displays the Graphic login screen with icons and usernames at startup.Let’s discuss about how to make your own customized login screen.
Change Windows XP Login Screen Steps
For doing this you just need to download and follow the steps given below: (Download EXE by clicking on following name)
a) Resource Tuner v1.99 RC3.rar ( With Crack )
b) emdadblog.zip
Extract both of these files and follow the steps given below
Change Windows XP Login Screen
1) First step is to generate your customized login screen so for that your need to First install Resource Tuner by double clicking on ResTuner_setup.exe.
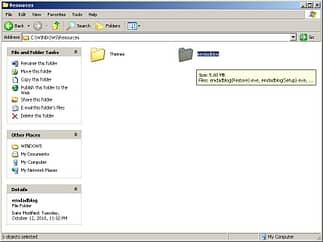
2) Then Copy emdadblogfolder on location C:WINDOWSResources (You need to copy this folder where OS resident) as shown in following figure.
3) Now Open logonUI.exe(which is located in same folder “C:WINDOWSResourceslogonUI.exe”) file with Resource Tuner(You Installed).
4) Navigate to Bitmap and click on 100. See below picture
5) Now double-click on 100 and choose a .bmp file of your own picture and replace with your previous .bmp picture. See below picture.(You can also change other things such as “WELCOME” “LOGGING OFF” “SHUTDOWN” text message and so on with resource tuner.)
6) After changing login screen according to you save it as logonUI.exe and move to emdadblog folder. Now run the emdadblog(setup).exe file to use your own customized login screen.
7) Now log off to see your customized login screen.
That’s all nothing to do anything. You will definitely enjoy changes. All credits goes to : http://emdadblog.blogspot.com. Thank you for giving us wonderful information.
 Tricks Window Technology Zone – Complete Technology Package for Technology News, Web Tricks, Blogging Tricks, SEO, Hacks, Network, Mobile Tricks, Android, Smartphones etc.


